Posts

LO1 - M1: Distribution and Marketing

Image
Distribution and marketing methods Distribution Vertical integration is when a company controls the production, distribution, and exchange of its products. The meaning of distribution in the context of the TEMPO magazine is where the magazine will be available to purchase for target audience members to buy and consume it. I believe that "Streetlight Haze" would be available to purchase from stores such as GAME, HMV, Waterstones, WHSmith, Amazon, Argos, CEX and eBay. I have chosen these stores for several reasons: The reason why I nominated HMV, CEX and GAME as stores for distributing this magazine is because these stores are Film, music, TV and video game stores, and I believe that members of the target audience are most likely to shop at these stores in hopes of looking for a product similar to "Streetlight Haze" and TEMPO in general. The reason why I believe that stores such as WHSmith and Waterstones are viable store choices is because they are both book stores t...

LO1 - P2: Sample Photos

Image
 

LO1 - P2: Practice Magazine

Image
 

LO4 - M4: Exported Media

Image
Evidence The program I used to create and edit the magazine was Photoshop. I used Photoshop as it is the best adobe software for editing images professionally and because of the creative freedom it gives you.   One of the main tools I used when creating my magazine was the clipping layer, which means that the content in the clipping layer will remain inside the content on the layer underneath. After adding the background to my magazine, the drawing i created needed to be adjusted due to the colours in the background. To resolve this issue, i edited the drawing by using clipping layers over it and used a solid colour that matched the background. I then changed the blending mode to multiply and lowered the opacity so that the drawing was more visible and so that the drawing only blended in with the colours of the background. I used the second clipping layer to add a teal glow to the edges of the drawing where the lighting from the smoke and text are placed. To create the glow effect,...

LO4 - P5: Post Production

Image
Post Production Process: In terms of post production, I used a variety of applications to achieve the end goal: The main software I used during the post production process was Adobe Photoshop. I decided to use this software as it allows me to add various special effects and edit images freely, with options to rearrange images and text using layers. As well editing the photos themselves, with adjustment options to change the lighting, colours, visual effects and more. Considering that I have access to Photoshop, I also get access to the variety of tools available and can put them to good use. For this contents page, I used the rectangle tool, text tool, lasso tool, masking and blending options. Effects used: Contents page For the contents page, and as mentioned earlier I used a variety of objects, images and effects to achieve what is seen here. I used the rectangle tool to create rectangular white backgrounds for each image I used. I did this to make the images more visible. I added wh...

LO3 - P4: Process

Image
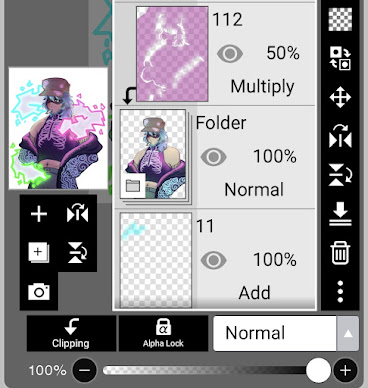
Instead of taking a photo for my magazine, I decided to draw the model, as the magazine is based on a cartoon-like rhythm video game. I thought that instead of having a photograph of a person, a 2D drawn model would be more fitting for the theme. When it came to the drawing process, i included several techniques while rendering the drawing. The one shown here is a darkened overlay I used over the entire drawing once I had finished it. I first put all of the layers I used into a folder and then added a clipping layer above that folder. I then coloured it completely in a solid purple colour, changed the blending mode to multiply and then played around with the opacity until I was happy with the result. To create the effect that the character was standing in a darkened area, I erased areas where the light hits them to add highlights. i spent approximately 13 hours on the main image. As well as using the additional layer to add dark lighting, I used more clipping layers on the line art whi...

LO2 - P3: Contact Sheets, Setting up and Model Release Forms

Image
Contact sheets: Here is my contact sheet where you can see all the photos I took during the photoshoot for my magazine: I highlighted the images I decided to use as a reference. I chose multiple photos instead of just one because I wanted to have multiple images to use as references for when it came round to drawing the front cover. Setting up equipment for photography: Here are images of me setting up the camera equipment so that it is prepared to take pictures of the model. I used a DSLR camera and a tripod set it up in front of a white backdrop. Model release form: Here is the model release form, where I got the model to sign their name and signature to show proof of having their permission to take photos of them and to be used as a reference for my magazine.